The Creality Ender 3, available in its original, V2, and Pro versions, has established itself as one of the most popular 3D printers in the market. Recognized for its affordability and user-friendly design, it has become a favorite among beginners and experienced 3D printing enthusiasts. However, understanding the specifications, especially regarding the bed size and print volume, can be somewhat confusing. In this comprehensive guide, we will delve into the details of the Ender 3 bed size, explaining the measurements, the reasons behind them, and how users can maximize their printing space.
What Is a Printing Bed?
The printing bed is a crucial component of any 3D printer. It serves as the foundation upon which 3D objects are built layer by layer. Quality and stability are essential attributes of a printing bed, ensuring the filament adheres firmly during the printing process. A heated printing bed often enhances results, allowing for better adhesion and easier removal of completed prints. The Creality Ender 3 comes with a glass printing bed, offering a solid foundation for various 3D printing projects.
What Are the Measurements for Creality Ender 3?
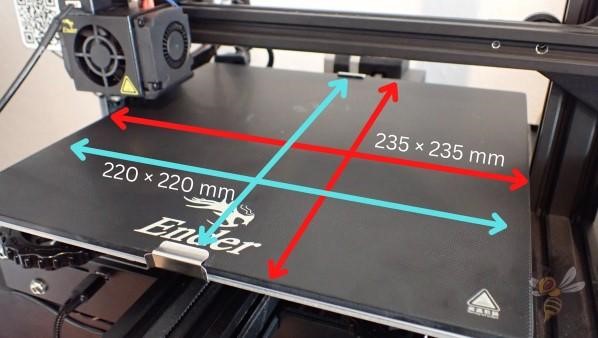
Understanding the dimensions of a 3D printer, especially the Ender 3, requires some clarification. The Creality Ender 3 is designed to be compact while providing a satisfactory printing surface. The specified construction volume is 220 × 220 × 250 mm, whereas the print bed size is slightly larger at 235 × 235 mm. This difference raises questions about the utilization of available space.
To clarify, the Creality Ender 3’s dimensions are as follows:
- Printing volume: 220 × 220 × 250 mm
- Printing bed size: 235 × 235 mm
- Size of the device: 440 × 410 × 465 mm
Ender 3 Bed Size: The Difference Explained
The reported print area of the Ender 3 is smaller than its actual bed size, which is not an anomaly but a deliberate design choice influenced by practical considerations. There are a couple of key reasons behind this intentional difference, and understanding them sheds light on the nuances of 3D printing with the Ender 3.
a) Clips
A primary factor contributing to the variance between the reported print area and actual bed size is the presence of clips. Unless you are utilizing a build plate that adheres magnetically or is directly affixed to the print bed’s carriage, the use of clips is a common practice. The factory-provided clips for some Ender 3 models are standard office binder clips, and they occupy a substantial portion of the bed’s periphery.
The extra 7.5 mm on all sides of the bed is a strategic allowance made to ensure that the nozzle of the 3D printer won’t interfere with these clips during the printing process. This additional margin serves as a buffer, preventing any accidental collisions that could potentially disrupt the printing or damage the equipment. It’s a practical measure to accommodate the physical constraints imposed by the clips, providing a hassle-free and reliable printing experience.
b) Tolerance Stack-Up
The construction of the Ender 3 involves a framework of mechanical joints and connecting rods, each having its own set of tolerances. Tolerance, in the context of mechanical engineering, refers to the permissible limit or variation in a physical dimension. Assembling a system with multiple components introduces what is known as “tolerance stack-up.” This phenomenon accounts for the cumulative effect of these individual tolerances, potentially leading to slight variations in the final dimensions of the machine.
While not as dominant a reason as clip accommodation, the additional bed space also serves to account for tolerance stack-up within the Ender 3. By providing this extra margin, the manufacturer ensures that even with the inherent variations in mechanical components, the specified print volume can be reliably achieved. This approach is a pragmatic one, acknowledging the realities of mechanical systems and aiming for consistency in the printing results.
Can I change the Ender 3 Bed Size?
Changing the bed size on your own might be an option you consider. If you feel up to the challenge, there’s virtually no reason not to exceed this size, and luckily, there are means to do so! Be cautious because the manufacturer likely chose the default print size with a tolerance margin in mind, even though some experts have documented increasing the print volume to larger dimensions.
You probably won’t have any issues if you wish to raise the print size in small increments, such as 5 mm. With some wiggle room in the Ender 3’s dimensions, you should be able to get your item in the exact size you want in 2 steps.
Step 1: Upgrade Your Hardware
Will you require a larger bed in the future? If so, you should probably upgrade your hardware.
If your setup is clip-based, you should probably switch up the installation format. You can either switch up your printing bed for a different one or remove the clips you’re using.
You will have to swap out your clips with something else if you decide to remove them. It’s time to unleash your inner do-it-yourself genius because there are plenty of commonplace objects that can serve as suitable alternatives.
Changing the print bed introduces its own set of inconsistencies, making the second approach more complicated. You can still select a different print bed, such as Creality’s magnetic bed, which is compatible with the Ender 3.
Step 2: Upgrade Your Firmware
If you own a Creality Ender 3, you may unlock more features and improve your 3D printing experience by upgrading the firmware. The maximum allowable print surface dimensions are 220 x 220 mm by default. Following the instructions, change the firmware to a newer version.
Alternatively, you can decide to change Ender 3’s code. To accomplish this, simply access the Marlin code and update your firmware to the most recent version. Changing this code requires some trial and error, but with BLTouch installed on your Ender 3, Pro, or V2, you can still make things convenient for yourself. If that alternative path appeals to you, this guide will be useful. An important piece of advice is to avoid setting your value higher than 235 x 235 mm.
Can I Exceed the Printing Volume?
While the manufacturer recommends a printing volume of 220 × 220 × 250 mm, users can, in fact, exceed these dimensions. However, caution is advised, especially for beginners. The specified volume includes a margin to accommodate potential variations in print outcomes and shifts in the printing bed. Experts may experiment with pushing the limits, but a margin of 5 mm on each side beyond the recommended dimensions is considered reasonable for most users.
Best 3D Modeling Software
It is beyond any doubt that SelfCAD is the best 3D design program available, and it is transforming the market with its exceptional features. Its integrated slicer makes 3D printing smooth and streamlines the design to the prototype process. The slicer is compatible with most commercially available 3D printers. With cloud-based access, customers have unmatched mobility and collaboration and can easily access projects from anywhere.
https://www.youtube.com/watch?v=8FJZy9X5Ds8
Interactive tutorials offer a user-friendly learning environment and foster emerging 3D creative skills. Professionals admire SelfCAD for its potent, specially designed tools. The roster of tools is also intuitive and easy to use.
SelfCAD offers various pricing plans, including a free version with limited options. Paid subscriptions, starting at $14.99 per month, provide unlimited designs, exports, 3D printing, and rendering options, fostering collaboration and project sharing.
Take Full Control of Your Ender 3 Print Space!
With the Creality Ender 3’s well-designed firmware, you can print to precise measurements. You can still make several adjustments to make it bigger, but in the end, the default size is fine, and you can still enjoy it. You should use caution so as not to harm your 3D printing equipment.